Saturday, May 10, 2014
How to deploy Hadoop cluster on FX10 supercomputer (Oakleaf-FX) - FX10スーパーコンピュータ上でHadoopの配備し方
In this tutorial, we will walk through the steps of deploying an Apache Hadoop 2 cluster on FX10 supercomputer offered by Information Technology Centrer, The University of Tokyo. It might be the same for other supercomputers powered by Fujitsu PRIMEHPC FX10.
Hadoop is a top open-source framework written in Java for running distributed applications processing a large-scale data set across clusters of commodity computers using simple programming model like MapReduce. Key features of Hadoop are scalable, fault-tolerant, and leveraging local computation. Hadoop can be divided into three main modules as follows:
- Hadoop file system (HDFS) provides distributed storage.
- YARN is responsible for resource manager and job scheduling.
- Hadoop MapReduce is a YARN-based application for running parallel processing on large data sets.
Using Hadoop so far has been untested yet on FX10 supercomputer since it is designed and optimized for only MPI programs in order to get the fastest performance. Moreover, Java is unofficially supported on FX10 using SPARC V9 architecture.
Let’s go to “hack” FX10 and deploy your own Hadoop cluster from the scratch.
1) Approach
Our approach is illustrated as Figure 1.
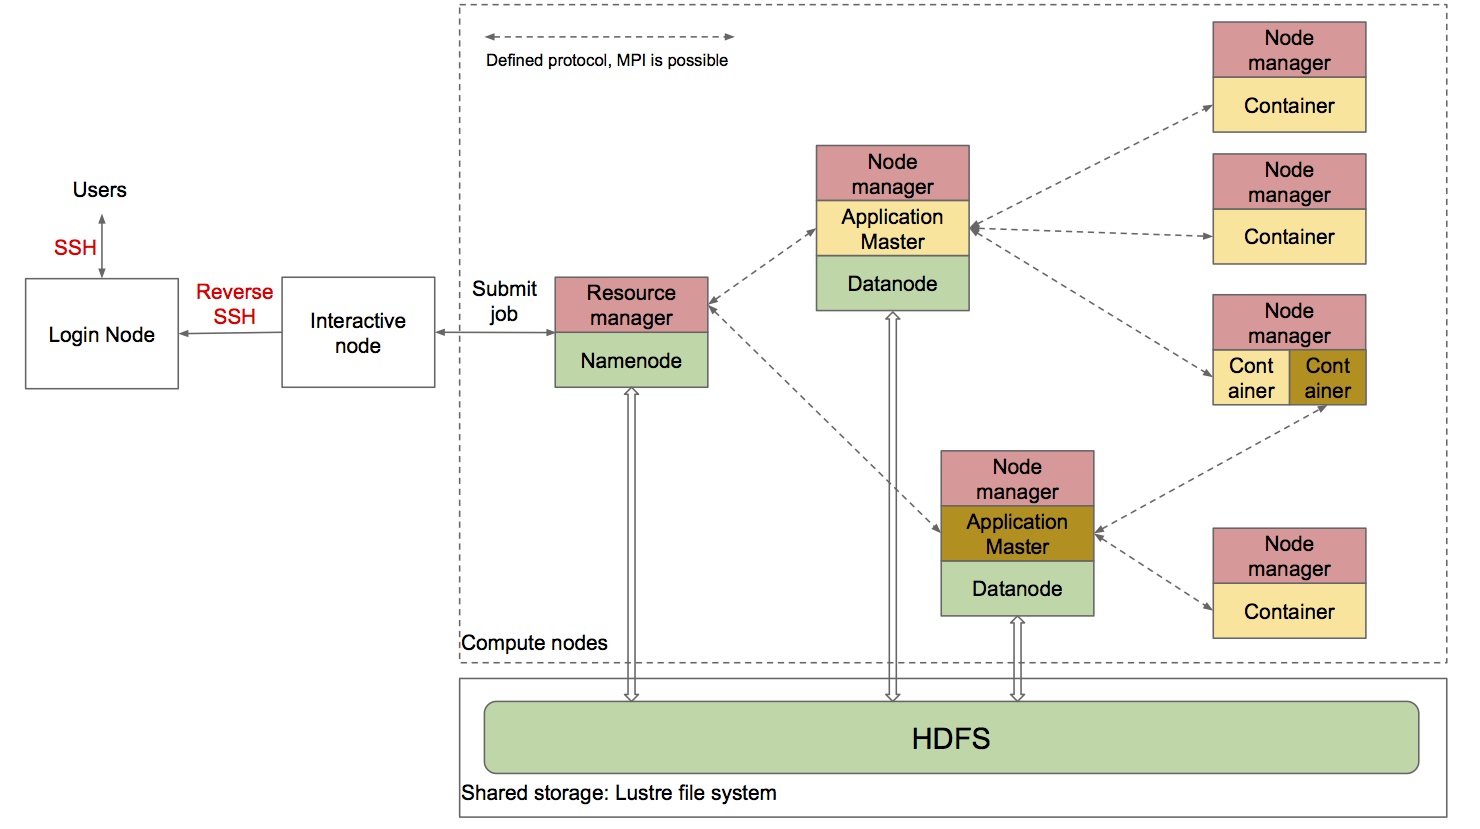
Each entity in the dashed rectangle is corresponding to one compute node of FX10. Namenode and Datanode in which HDFS is employed are connected to shared storage using FEFS file system (Lustre). There are defined numbers of nodes responsible for Datanode and Nodemanager, respectively. Resourcemanager and Namenode are located in the same node.
User will submit MapReduce job from an interactive node.
2) Preparation
Of course, you need a FX10 account. Log into your account and download all necessary following files first to a certain directory, e.g. /group1/gc22/c33333/hadoop
- Hadoop 2.2.0
- Here is binary distribution version of Hadoop 2.2.0. We built it from Hadoop source code after fixing a minor bug of org.apache.hadoop.io.FastByteComparisons class that makes the original version not able to run stably on SPARC Linux JVM. - OpenMPI 1.7
- Here is OpenMPI Java library containing mpi.jar file. - Configure file
- You need to change constants in this file. - Generate file
- This file will generate haddop.sh file for deployment. - Deploy file
- This file is used to deploy Hadoop code on every node.
3) Deploy Hadoop
- Modify Configure.java
public class Configure { /* Constants defined by User */ /** * Deploying directory for whole data: source code, storage, logs, and so on. */ public final static String DEPLOY_FOLDER = "/group1/gc22/c33333/hadoop"; /** * Java home path. "/usr/local/java/openjdk7" is JAVA_HOME on FX10. */ public final static String JAVA_HOME = "/usr/local/java/openjdk7"; /** * Username on FX10 */ public final static String USERNAME = "c33333"; /** * Running time for Hadoop cluster */ public final static String ELAPSED_TIME = "2:00:00"; /** * Number of node used for deploying */ public final static int NUMBER_OF_NODE = 5; /** * Number of node for data storage. Keep two if you do not know exactly what is it. */ public final static int NUMBER_OF_DATANODE = 2; } - Generate JOB .sh file
- Go to DEPLOY_FOLDER: cd /group1/gc22/c33333/hadoop
- javac Generate.java
- java Generate
hadoop.sh will be created automatically.
- Deploy Hadoop
pjsub hadoop.sh
Wait a couple of minutes until you check hadoop.sh.oXXXXXXX generated in the same directory and should see something as follows in the end of file:
Format Namenode --> OK
Start Master --> OK
Hadoop is READY!!!
Slave node 2 is starting
Slave node 3 is starting
Slave node 1 is starting
Slave node 4 is starting
Start slave node 3 --> OK
Start slave node 4 --> OK
Start slave node 2 --> OK
Start slave node 1 --> OK
4) Submit jobs to Hadoop cluster
- From the DEPLOY_FOLDER /group1/gc22/c33333/hadoop:
pjsub --interact
- Go to Namenode source code directory
cd hadoop/code/0
- Submit WordCount MapReduce job as an example
- bin/hdfs dfs -copyFromLocal ../../../../cluster/exp /data     (Copy a data directory containing text files to HDFS file system)
- bin/hdfs dfs -ls /data     (Check data directory in HDFS)
- bin/hadoop jar share/hadoop/mapreduce/hadoop-mapreduce-examples-2.2.0.jar wordcount /data /result     (Run wordcount example provided in hand)
- bin/hdfs dfs -ls /result     (Check the result directory)
- bin/hdfs dfs -text /result/part-r-00000     (Check an output file)
5) Hadoop Web GUI via SSH Reverse tunnel
Hadoop provides a web-based GUI for checking and tracking health and running applications on port 50070 and 8088 of Namenode. However, from the web browser, it is impossible to access directly to compute node of FX10 due to security problems. On the other hand, it is possible to access them from Interactive node and also it is feasible to log into Login node from Interactive node using a private key. The following command can tunnel ports from compute node to your web browser.
- On Interactive node
vi hadoop/code/0/etc/hadoop/core-site.xml     --> get Namenode IP address, e.g. 172.17.42.81
ssh -i your_private_key_to_FX10 -fN -R 50070:172.17.42.81:50070 oakleaf-fx-3     --> Forward 50070 port to login node (oakleaf-fx-3)
ssh -i your_private_key_to_FX10 -fN -R 8088:172.17.42.81:8088 oakleaf-fx-3     --> Forward 8088 port to login node (oakleaf-fx-3)
- On your machine
ssh -fN -q -L 50070:localhost:50070 c33333@oakleaf-fx-3.cc.u-tokyo.ac.jp     --> Forward 50070 port from oakleaf-fx-3 to your machine
ssh -fN -q -L 8088:localhost:8088 c33333@oakleaf-fx-3.cc.u-tokyo.ac.jp     --> Forward 8088 port from oakleaf-fx-3 to your machine
Open your web browser:
http://localhost:50070/dfshealth.jsp
http://localhost:8088/dfshealth.jsp